Want to be a Contributor?

WANT TO BE A CONTRIBUTOR TO GOURMET DIY SHANGHAI?
Send an email to Heather at gourmetdiyshanghai@gmail.com and I will send you an invite to be a coauthor.
Showing posts with label kitchen tips. Show all posts

Tuesday, June 25, 2013

Homemade Popsicles!

As we are staying in Shanghai this summer I'm trying to find ways to keep cool. I bought these popsicle makers at IKEA for an article I wrote last month and we've been having fun making homemade popsicles these past few days.
They are 10RMB a piece and really easy to use. Simply fill them up to the little line inside and put the plastic stick inside. Put in the freezer for a few hours until frozen. When pulling them out of the mold, a good tip is to hold them in your hand for a minute. THe heat from your hand will be just enough to melt them a bit and make it easier to remove.
Just Google homemade popsicles and you will find lots of ideas, but the easiest way to make popsicles is simply fill them with store bought juice. We have made grape, apple and coconut popsicles this week. My favorite is coconut and my boys like the grape ones. They have a lot less sugar than regular popsicles, no artificial colors added and the kids think it is so cool to make it themselves!


Wednesday, June 19, 2013

De-skinning Tomatoes

Ugg! Serious computer problems the last week with my hard drive dying (in the middle of trying to post to the blog) and then a whole lot of VPN problems. But now everything is sorted (fingers crossed)!

Years of helping my mom home bottle tomatoes every summer has taught me this little trick for removing tomato skins. For some recipes (like this Marinara Sauce) I am much too lazy to remove the skins, but for some recipes (like my Cream of Tomato Soup) you really need to remove them so you won't have bits of tomato skin floating around.

After washing your tomatoes, score the bottom of the tomato with an X.

Bring a pot of water to a boil.
When the water is boiling add tomatoes.
Boil for 3-5 minutes until you can see the skin starting to pulll away from where it has been cut.

Using a slotted spoon remove the tomatoes from the water.
Let the tomatoes cool slightly until you are able to touch them without burning your hands.
Peel the skins off.


Core the tomatoes. You can also de-seed them if you want exceptionally smooth texture. Use as needed in soups, pasta or other recipes.

Thursday, May 2, 2013

Instant Breadcrumbs

I can't tell you the number of times I've had the end of the baguette go stale before we finish it.
I bought a baguette last week and then my ayi ended up making dinner a whole bunch of nights in a row so there it sat on the counter until it became hard as a rock. The boys had been begging me to make them spaghetti and meatballs (I guess I've read them Olivia books a few too many times) so I figured that I would use the stale baguette to make breadcrumbs to go in the meatballs. Only problem is that I don't have a food processor and I didn't relish the idea of using a rolling pin to smash the baguette(such a mess, takes so long, and the pieces are large and uneven)
So I came up with the brilliant idea to use my cheese grater instead.
It worked great! The breadcrumbs were really fine- all the same size and perfect for using for meatballs.


Tuesday, February 26, 2013

Cake Pan Coating

This pan coating is a great little baking tip. It works so much better than just regular cooking spray for coating cake pans. The cakes come out so well, and when I use it, I've never had trouble with part of the cake still being stuck in the pan. It is especially great for pans that have lots of texture like a bundt pan, a character pan or like this giant cupcake pan I have.

Ingredients:
1/4 cup (80 ml) shortening
1/4 cup (80 ml) oil (I always use 100% corn oil here in China- it imports the least amount of flavor. I've found that a lot of the blended oils contain sunflower seed oil which I do not like. It gives the bread a certain taste, almost peanuty and I do not care for the taste in the majority of things I bake)
1/4 cup(30g) flour

Directions:
Mix all ingredients until smooth. Use your fingers or a paper towel to smooth coating over the entire surface of your cake pan. Fill as normal. When cakes are fully baked, let them cool for 5-10 minutes then remove from pans.(Letting the cakes rest will help them firm up slightly; but make sure to take them out before they start to sweat or else the cakes may stick to the pan.)


Thursday, December 27, 2012

Homemade Corn Tortilla Chips

If you've lived here in Shanghai awhile chances are that you have heard of the Avocado Lady. She is a Chinese lady that has a little "no frills" shop in the Former French Concession where, among other imported things, she sells avocados and corn and flour tortillas.

When I was preparing to come to Shanghai I heard from a friend(who had lived here close to ten years ago) that you couldn't get corn chips or corn tortillas here, so I actually packed a bag of masa de harina in one of my suitcases so I could make corn tortillas and corn tortilla chips. And while I quickly discovered that times had changed since that friend lived here and that I could buy corn tortilla chips(albeit for a small fortune), I did in fact put that masa to good use and laboriously made fresh corn tortillas and tortilla chips.

Needless to say I was seriously grateful the day my husband came home from a little trip to the Avocado Lady with a huge bag of about 50 corn tortillas for only 28RMB. I'm not sure what the going rate is here for a bag of tortilla chips but I can tell you that you will get a whole lot more than a bag with half of one of these bags of corn tortillas cut into wedges.

This is one DIY secret that is too good to keep to myself, even if it does mean that the next time I go to buy corn tortillas the Avocado Lady will be out of them! This is so easy to do and you will be surprised at how quickly you can turn out fresh corn tortilla chips!

Ingredients:
Corn Tortillas
Corn Oil
Salt

Directions:

*Here is the bag of corn tortillas so you can see what it looks like- I usually use 1/4- 1/3 of a bag at a time. Make sure you refrigerate or freeze the remaining tortillas or they will go moldy after they have been opened.
Using a sharp chef's knife, cut stack of tortillas into six wedges.

Add about 1 inch of oil to your wok. Heat oil over medium heat until hot.


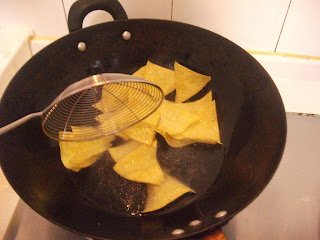
Add corn tortilla wedges and fry until they are crisp and inflexible. You want to cook them just until they get firm, but not too toasted.

Stir with a slotted spoon, so that they cook evenly.


Using a slotted metal spoon or strainer, remove chips from oil and drain on paper towels.
 
Place in large bowl. Sprinkle with salt to taste. (Careful not to add too much salt- amount depends on how many tortilla chips you decide to make that day!)
Yum! (Not many left at this point!) Serve all the ones that you didn't consume for a taste test with guacamole and fresh salsa.

Tuesday, October 16, 2012

Homemade Lemon Extract

I love making homemade lemon poppyseed muffins. They are so easy and so much cheaper then buying a muffin mix. Last year I brought back a few bottles of lemon extract from the States for the purpose of using them for homemade muffins. Then this summer my mom bought me a great book called "Make the Bread, Buy the Butter" where the author made her own lemon extract. Needless to say I decided to forgo packing all those bottles of extract and instead packed the book instead!

Ingredients:
200 ml Vodka
zest from 3 lemons

Buy Vodka and lemons. I bought vodka off of Taobao because I just wanted a small bottle of it that I could reuse for storing the extract. Make sure you select fresh lemons with bright peels. Stay away from lemons that appear dry.
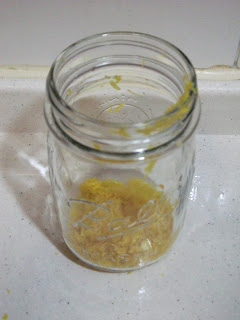
Zest all three of your lemons. Make sure to only grate the yellow part- do not get any of the white part.
Put zest into a bottle that has a lid. I just used a canning jar because it was what I had.
Add vodka.
Secure lid
Shake.


Store in a dark place for 10 days, taking it out once a day to shake.
After ten days your extract is ready to use.
Strain the peel out of the alcohol.
Find a bottle or use the same one you got the vodka from and label it.
Use a funnel and pour your extract into the bottle.
And you are done. I probably spent 35 quai on this and it will last me for an entire year.

Monday, October 15, 2012

Dulce de Leche

I had never heard of this method of making dulce de leche (caramelized sweet milk) until my dad saw it online and decided to try it. I must admit I thought he was a little crazy at the time, but it works great and who doesn't love caramel?
When I came to China I was surprised that sweetened condensed milk was readily available at every grocery store.(I guess when you see everything that is lacking, it strikes you odd that they actually do have an item you're looking for)
This dulce de leche make a great caramel dip for apples, or you can use it in place of icing to spread on a cake or brownies. Or what would be simply amazing (which I haven't tried, but just thought of right this minute) would be to use it to make caramel apple crumb pie. Oh, baby. I just might have to try that and report back. Anyway, enjoy!

Ingedients:
1 can of sweetened condensed milk

Directions:

Peel the label off of the can and place the can in a pot. Cover with water.
Bring to a boil. Boil for 3 hours.
Add more hot water as needed as the water will evaporate and you need to keep the can covered at all times (*Or risk an explosion in your kitchen)

I heat up a glass of water in the microwave for this so it doesn't bring down the temperature in the pot.
After the can has boiled three hours, turn of the heat. Drain the water and replace with cold water. Do this a few times until the can is cool.
Open and enjoy your dulce de leche!

Sunday, July 22, 2012

Baking Pumpkin

Fresh pumpkin is very easy to use as a substitute for canned pumpkin. In China it is much cheaper to use than canned and it is available all year round. I use it in muffins, bread, pumpkin pie, pumpkin donuts and pumpkin praline dessert.
You can find it at the grocery store or at the vegetable markets. I find that the butternut squashy looking pumpkin has a very sweet flavor while the squash that looks like a small orange pumpkin is less sweet and has more intense squash flavor.
Begin by trimming off the cut end of the squash. I always cut off the bottom 1/2 inch because I don't know how clean it is after being cut at the vegetable market.
Next cut off the stem end.
Cut in half and then either using a knife or a spoon remove the "guts" or the soft inner part of the pumpkin.
Use a knife to trim off the outer rind of the pumpkin.
If necessary, use a vegetable peeler to get all of the outer skin.
Cut into wedges and place in a baking dish. Add 1/4 inch of water to the bottom of the pan.
If you want a really soft puree you can cover it with tin foil before you bake it. (This is okay if you are using the pumpkin in muffins or breads- just subtract a little liquid or add a little extra flour to compensate for the liquid) If you want to use it for pumpkin pie or other desserts leave the pumpkin uncovered until the last twenty minutes of baking- then cover with tin foil to prevent burning.
Bake at 375˚ for 45min to 1 hour.
Remove from oven. Let cool uncovered. Drain water.
If I want the puree really fine I will put the cooked pumpkin in the blender and blend it. If I'm using it for bread I will sometimes just stick the cooked pumpkin pieces in a plastic ziploc bag and smoosh it up in there or use a fork to mash it!
Use it for your pumpkin favorite recipes.